Before diving to answer this question, it is appropriate at this moment to understand that recording is not by setting the gadgets, and BAM you are good to go expecting the best outcome of the audio recording. But importantly considering the equipment, budget, and location of your audio recording studio. there are text-to-speech software, video spoke person and much more. The budget is the most important factor in deciding your next step to recording audios.
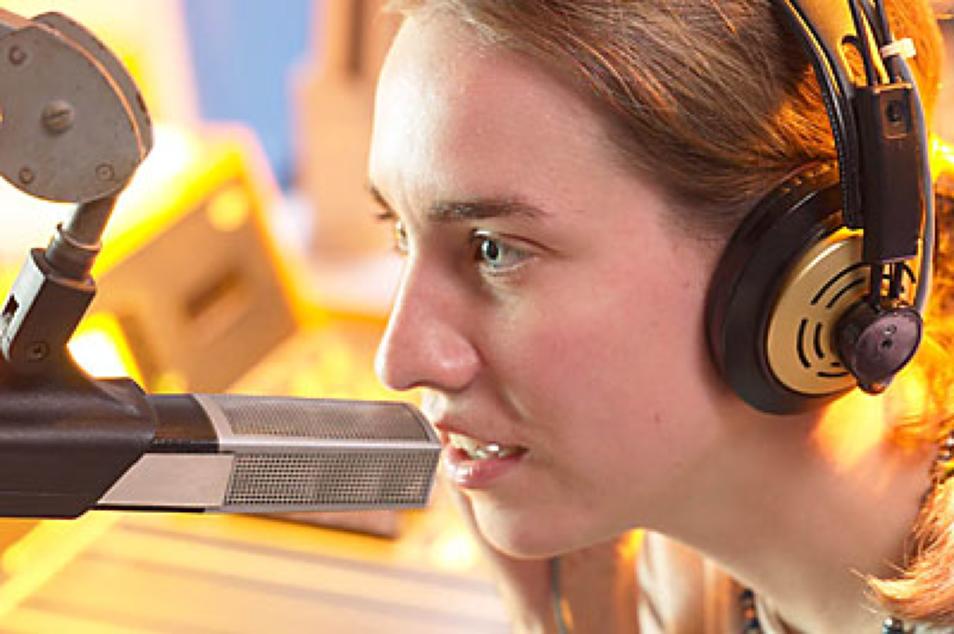
Benefits of Recording with a Condenser Microphone
Recording audio is a vital aspect of various fields, including music production, podcasting, voice-over work, and content creation. Among the different types of microphones available, a condenser microphone stands out as a popular choice for many professionals. In this document, we will explore the reasons why recording with a condenser microphone yields superior results and is favored by audio enthusiasts and professionals alike.
1. Sensitivity and Accuracy:
Condenser microphones are renowned for their high sensitivity and accuracy in capturing audio. They excel at picking up even the tiniest nuances of sound, making them ideal for capturing vocals, acoustic instruments, and other delicate audio sources. Their ability to faithfully reproduce the full spectrum of sound frequencies ensures a more natural and detailed recording.
2. Extended Frequency Response:
One of the key advantages of condenser microphones is their extended frequency response. They can accurately capture a wide range of frequencies, from the lowest bass to the highest treble. This feature is particularly valuable when recording musical performances or capturing vocals with exceptional clarity and definition.
3. Low Noise and Distortion:
Condenser microphones are designed to minimize noise and distortion, resulting in cleaner recordings. They have a low self-noise level, which means they capture audio without adding unwanted background noise. Additionally, their low distortion levels ensure that the recorded sound remains faithful to the original source, without any unwanted artifacts or coloration.
4. Versatility:
Condenser microphones offer versatility in their applications. Their sensitivity and accuracy make them suitable for a wide range of recording scenarios, whether in a professional studio setting or a home recording environment. They can be used for capturing vocals, acoustic instruments, podcasts, interviews, and much more. With the right technique and positioning, condenser microphones can deliver exceptional results across various audio recording needs.
5. Phantom Power:
Most condenser microphones require phantom power to operate. This external power source, typically provided by audio interfaces or mixing consoles, ensures that the microphone receives the necessary voltage to function optimally. While this may be an additional requirement, the benefits of using a condenser microphone outweigh the need for phantom power, especially when it comes to the quality of the recorded audio.
Conclusion:
Recording with a condenser microphone offers numerous advantages in terms of sensitivity, accuracy, extended frequency response, low noise, and versatility. Whether you are a musician, podcaster, voice-over artist, or content creator, a condenser microphone can elevate the quality of your recordings. By capturing the subtle details and nuances of sound, it allows for a more professional and engaging audio experience. Consider investing in a condenser microphone to enhance the quality of your recordings and take your audio production to the next level.
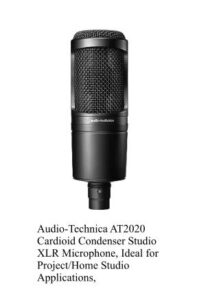
The best recommended condenser microphone
for clear recording is the Audio-Technica AT2020. With its cardioid polar pattern and wide dynamic range, the AT2020 captures every detail of the sound source with exceptional clarity. It features a low-mass diaphragm and a high SPL handling capability, ensuring accurate and transparent audio reproduction in various recording scenarios. The microphone also boasts a rugged construction, making it suitable for both studio and live recording applications. The AT2020 is highly regarded by professionals and enthusiasts alike, delivering professional-grade performance at an affordable price point. Whether you are recording vocals, instruments, podcasts, or voiceovers, the Audio-Technica AT2020 is the go-to choose for achieving clear and pristine sound quality.
How to Record on Audio-Technica AT2020
The Audio-Technica AT2020 is a popular microphone used by professionals and enthusiasts alike for recording various types of audio. Whether you are a podcaster, musician, or content creator, this guide will walk you through the step-by-step process of recording on the Audio-Technica AT2020.
Requirements:
To begin recording on the Audio-Technica AT2020, you will need the following equipment and software:
1. Audio-Technica AT2020 microphone
2. XLR cable
3. Microphone stand or boom arm
4. Shock mount (optional, but recommended)
5. Pop filter (optional, but recommended)
6. Audio interface or mixer with XLR input
7. Recording software (such as Audacity, Adobe Audition, or GarageBand)
Step 1: Setting up the Microphone
1. Connect the XLR cable to the bottom of the AT2020 microphone.
2. Attach the other end of the XLR cable to the XLR input on your audio interface or mixer.
3. If using a shock mount, attach it to your microphone stand or boom arm.
4. Mount the AT2020 onto the shock mount.
5. If using a pop filter, attach it to the microphone stand or boom arm in front of the microphone.
Step 2: Connecting the Audio Interface or Mixer
1. Connect the audio interface or mixer to your computer using a USB cable or other appropriate connection.
2. Ensure that the audio interface or mixer is powered on and recognized by your computer.
Step 3: Configuring the Recording Software
1. Open your preferred recording software on your computer.
2. Select the appropriate audio input device (audio interface or mixer) in the software’s settings or preferences menu.
3. Set the desired recording format and quality (such as WAV or MP3 and sample rate).
4. Adjust the input gain or volume control on your audio interface or mixer to achieve the desired recording level.
Step 4: Testing and Adjusting the Recording Setup
1. Put on headphones or monitor speakers connected to your audio interface or mixer.
2. Speak or sing into the AT2020 microphone at a normal level.
3. Monitor the input level meter in your recording software to ensure it is not clipping or distorting.
4. Adjust the input gain or volume control on your audio interface or mixer as needed to achieve an optimal recording level.
Step 5: Recording
1. Position yourself in front of the AT2020 microphone at an appropriate distance.
2. Press the record button in your recording software to start recording.
3. Perform your desired audio content, ensuring that you speak or sing into the microphone clearly and at a consistent volume.
4. When finished, press the stop button in your recording software to end the recording.
Step 6: Reviewing and Saving the Recording
1. Play back the recorded audio to ensure it meets your expectations.
2. If necessary, make any additional adjustments to the recording settings or microphone placement.
3. Save the recording in your desired file format and location on your computer.
Conclusion:
Recording on the Audio-Technica AT2020 is a straightforward process that can yield professional-quality audio recordings. By following the steps outlined in this guide, you will be able to set up and use the AT2020 effectively for your recording needs. Remember to experiment with different microphone techniques and settings to achieve the best results. Happy recording!
What are the Recommended Audio Mixer for Beginners
When it comes to audio mixing, having the right equipment is crucial for achieving professional-grade sound. For beginners who are just starting out in the world of audio production, choosing the right audio mixer can be a daunting task. To make things easier, we have compiled a list of recommended audio mixers that are perfect for beginners.
1. Behringer Xenyx Q802USB Mixer: This compact mixer is ideal for beginners due to its user-friendly interface and affordable price. It features 8 inputs, including 2 microphone preamps, and built-in USB connectivity for easy recording and playback. The Xenyx Q802USB also comes with a range of useful features such as British-style EQs and a built-in stereo USB audio interface.
2. Yamaha MG10XU Mixer: The Yamaha MG10XU offers a great balance between affordability and functionality. It features a total of 10 inputs, including 4 microphone preamps, and built-in effects such as reverb and delay. The MG10XU also comes with a USB interface for recording and playback, making it a versatile option for beginners.
3. Allen & Heath ZED-10FX Mixer: This mixer is perfect for beginners who are looking for professional-grade audio mixing experience. It features 10 inputs, including 4 microphone preamps, and built-in effects such as reverbs, delays, and choruses. The ZED-10FX also comes with a USB interface for easy recording and playback, as well as a 3-band EQ and high-pass filter for precise sound shaping.
4. Mackie ProFX8v2 Mixer: The Mackie ProFX8v2 is a versatile mixer that offers a range of features suitable for beginners. It features 8 inputs, including 4 microphone preamps, and built-in effects such as reverbs, delays, and choruses. The ProFX8v2 also comes with a USB interface for easy recording and playback, as well as a 3-band EQ and high-pass filter for precise sound control.
5. PreSonus StudioLive AR8 USB Mixer: The PreSonus StudioLive AR8 USB is a compact mixer that offers a wide range of features for beginners. It features 8 inputs, including 2 microphone preamps, and built-in effects such as reverb and delay. The AR8 USB also comes with a USB interface for recording and playback, as well as a 3-band EQ and high-pass filter for precise sound adjustment.
These are just a few of the recommended audio mixers for beginners. Each mixer offers its own unique features and benefits, so it’s important to consider your specific needs and budget when making a decision. Remember to take your time and do thorough research to find the audio mixer that best suits your requirements. With the right equipment, you’ll be on your way to creating professional-quality audio in no time.
Why do I need an audio mixer?
An audio mixer is an essential tool for anyone involved in audio production or live sound engineering. It serves as the control center for all audio sources, allowing you to adjust and manipulate sound signals to create a well-balanced and professional audio output. Whether you are a musician, podcaster, DJ, or sound engineer, an audio mixer offers several key benefits that make it a crucial piece of equipment in your setup.
First and foremost, an audio mixer allows you to combine multiple audio sources into one unified output. This is particularly useful in situations where you need to amplify and mix different sound elements, such as instruments, vocals, and background tracks. By adjusting the volume levels and applying various audio effects, you can achieve a cohesive and polished sound that enhances the overall listening experience.
Moreover, an audio mixer provides precise control over each individual audio channel. This means you can adjust the volume, tone, and effects of each source independently, allowing for fine-tuning and customization. For example, if you are recording a podcast, you can use an audio mixer to balance the voices of multiple speakers, eliminate background noise, and add effects like reverb or compression.
In addition to its mixing capabilities, an audio mixer also serves as a hub for connecting various audio devices. It typically features multiple inputs and outputs, accommodating a wide range of audio equipment such as microphones, instruments, computers, and speakers. This versatility enables you to integrate different audio sources seamlessly and route the signals to the desired destinations.
Furthermore, an audio mixer often includes built-in features that enhance audio quality and functionality. These may include equalizers, compressors, noise gates, and effects processors, among others. These tools enable you to shape the sound to your liking and correct any imperfections, resulting in professional-grade audio recordings or live performances.
Lastly, an audio mixer offers convenience and efficiency. With its intuitive controls and layout, you can easily make real-time adjustments on the fly, without interrupting the audio flow. This is particularly important in live sound scenarios where quick adjustments may be required. Additionally, an audio mixer allows you to save and recall different settings, making it easier to reproduce specific sound setups or switch between different projects.
In conclusion, an audio mixer is an indispensable tool for anyone working with audio. Its mixing capabilities, precise control, connectivity options, built-in features, and convenience make it a valuable asset for musicians, podcasters, DJs, and sound engineers. With an audio mixer, you can achieve professional-level sound quality, unleash your creativity, and enhance the overall audio experience for your audience.
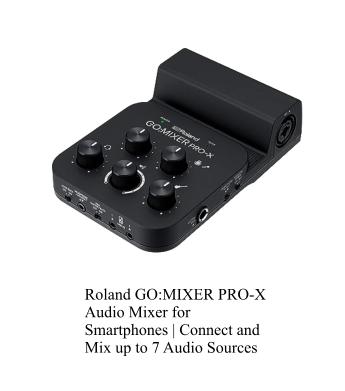
Which mixer to choose?
It depends on your budget and how you are going to use it. However, here are our recommendations if you are on the go type of person who records without a studio.
How do I Rectify Post Audio Recording
In the world of audio production, post audio recording plays a crucial role in enhancing the quality and clarity of recorded audio. Whether you are a professional sound engineer or a beginner looking to improve your audio recordings, the process of rectifying post audio recording can greatly benefit you. In this document, we will explore various techniques and tools that can be used to rectify post audio recordings and achieve optimal sound quality.
Understanding Post Audio Recording
Post audio recording refers to the process of modifying and improving audio recordings after the initial recording has taken place. It involves correcting any imperfections, enhancing the overall sound quality, and ensuring that the audio is clear and balanced. Post audio recording is commonly used in various fields such as music production, podcasting, film and video production, and broadcasting.
Common Issues in Post Audio Recording
Before diving into the rectification process, it is essential to identify common issues that may arise in post audio recordings. Some of these issues include:
1. Background Noise: Unwanted noise, such as hums, hisses, or ambient sounds, can often be present in audio recordings. Rectifying such noise is crucial to ensure a clean and professional sound.
2. Distortion: Distortion can occur when the audio signal is too loud, resulting in a harsh and unpleasant sound. Rectifying distortion is vital to restore the original dynamics of the recording.
3. Imbalanced Audio Levels: Uneven audio levels between different tracks or instruments can cause an unbalanced mix. Rectifying imbalanced audio levels is essential to achieve a cohesive and well-balanced sound.
Techniques for Rectifying Post Audio Recording
There are several techniques and tools available for rectifying post audio recordings. Here are some commonly used methods:
1. Noise Reduction: Noise reduction software can be used to analyze and remove unwanted background noise from the audio recording, resulting in a cleaner sound.
2. Equalization (EQ): EQ allows you to adjust the frequency response of the audio, helping to correct imbalances and enhance specific elements of the recording.
3. Compression: Compression helps to control the dynamic range of audio recordings, ensuring that the loudest and softest parts are balanced. This technique can help to rectify distortion and create a more controlled and polished sound.
4. De-essing: De-essing is used to reduce or eliminate harsh “s” and “sh” sounds that can be present in vocal recordings. This technique helps to rectify any sibilance issues and improve overall clarity.
Conclusion
Rectifying post audio recording is an essential step in achieving high-quality sound in various audio production fields. By utilizing techniques such as noise reduction, equalization, compression, and de-essing, you can effectively rectify common issues and improve the overall quality of your audio recordings. Experimenting with different tools and techniques will allow you to develop your skills and produce professional-grade audio content.
Comments are closed, but trackbacks and pingbacks are open.